 Blogs
Blogs
Deep Linking in React Native apps
Deep Linking is the reason why you click on a link, and it opens up an app that’s installed on your device. Most of the time, it directly opens up particular screens in the app. Implementing Deep linking in your app means easing up the user experience of your application so that users can be directed to a screen in your application without manually opening and navigating the app.
How can this functionality be set up in a React Native project? That’s what I will be going over in this article. I will explain how it works and how to implement it on Android and iOS, and then I will show live instances of deep linking in a React Native application.
You can get the complete source code of this tutorial here on Github.
Prerequisite
To follow along with this tutorial, basic knowledge of React Native is important, and you should have React Native set up on your computer. An Android and an iOS simulator should also be set up for testing the application. You can learn more about how you can set up React Native and the Android and iOS simulators here. Also, you should have a basic understanding of React Navigation and how to set it up in your React Native project. Click here to learn more about React Navigation.
How Deep Linking Works
Deep linking is the configuring of an application and the screens of that application so that the application can be launched and navigate to a screen within the application when a certain link is accessed.
This means that the application is configured with a unique URI, the URI Scheme. The purpose of this URI scheme is to locate and launch the application as long as it’s installed on the device. For the application to now navigate to a screen, prefixes must be set up that will match the URI scheme. These prefixes must be set to the same URI scheme on which the application was configured. If not, the application will be launched when the URI is accessed but won’t be able to navigate to any screen.
Once the prefixes have been set to match the URI scheme, there should be a mapping of the screens in the application with their path so that when the path is attached to the URI, the application can directly navigate to the screens.
Setting up Deep Linking in a React Native Project
This tutorial will show you how to set up deep linking in a React Native project using React Navigation and delve into the tutorial. Instead of initializing a React Native project, I have set up a demo project upon which I will demonstrate this tutorial. Click here to access the demo project on Github. Use the commands below to clone it and download the node modules alongside the iOS dependencies for this project.
#Clone Demo Project
git clone https://github.com/championuz/RNDeepLinkingProj.git

#Install Node Modules
npm install

# Navigate to the ios folder and Install iOS dependencies
cd ios && pod install

#Navigate back to the Project root folder
cd ..

#Run on Android Emulator
npx react-native run-android

#Run on iOS Simulator
npx react-native run-ios
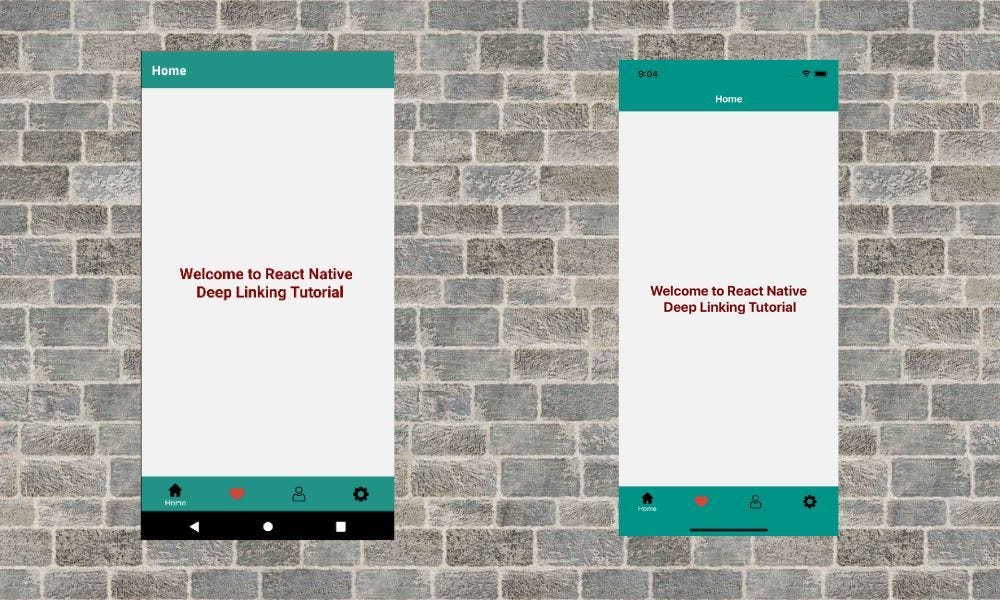
After building the demo project on your Android and iOS emulators, you should have it show up like this:
Setting up Deep Linking in Android and Setting Android URI Scheme
To set up Deep Linking in Android, you will need to modify a few things in the AndroidManifest.xml file, or you can use a package to handle the setup. In this tutorial, I will be using the manual route which involves modifying the AndroidManifest.xml manually. To learn more about using the package to configure Android, click here.
Moving on, navigate to android/app/src/main/AndroidManifest.xml. You will be modifying the launchMode of MainActivity to singleTask. If it is set to singleTask by default, you won’t need to modify it.
Next, add a new intent-filter inside the MainActivity and set the android:scheme to your URI scheme; see below:
<activity
  .....
  <intent-filter>
    <action android:name="android.intent.action.VIEW" />
    <category android:name="android.intent.category.DEFAULT" />
    <category android:name="android.intent.category.BROWSABLE" />
    <data android:scheme="demoapp" />
  </intent-filter>
</activity>
After setting this, using the commands stated above, rebuild your project in your Android emulator.
Setting up Deep Linking in iOS and Configuring iOS URI Scheme
To set up deep linking in iOS, you must set your URI scheme under URI types in Xcode. Then, you will be required to modify the AppDelegate file before rebuilding the project in your iOS simulator.
Setting the iOS URI Scheme You need to open your React Native iOS project in Xcode. to easily do that, use the command below to navigate to your iOS folder and open the project in Xcode.
cd ios && open RNDeeplinkingProj.xcworkspace
Note that RNDeeplinkingProj is the name of the demo project, so if you called your project a different name, you would be required to use the name of your project instead of RNDeeplinkingProj.
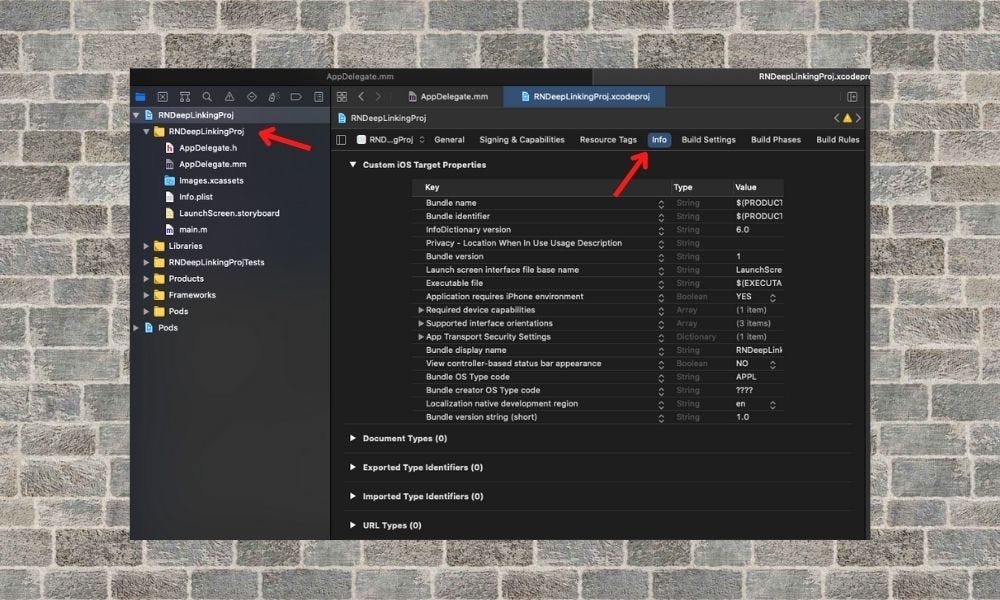
Once your project is open in Xcode, click on the project folder, and from the tabs, click on info. You should scroll till you find URI Types.
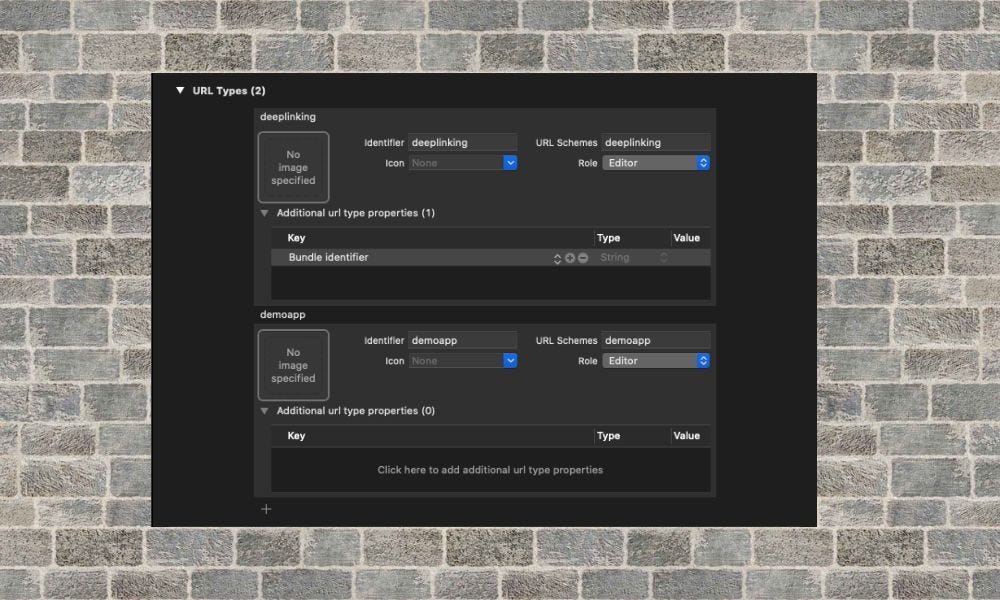
Click on the + to add a new URI type. You can input your URI scheme in the identifier and URI schemes field. See the image below:
Configuring Deep linking for iOS Still, in Xcode, click on the dropdown icon next to your project folder and you will find another group with your project name, click on it and double-click on the AppDelegate file to open it.
When it’s open, copy the code below to the top of the file to import RCTLinking to your project.
//Add to the top of the file
#import <React/RCTLinkingManager.h>

Next, add the code below just above @end at the bottom of the file.

// Add this above `@end`:
- (BOOL)application:(UIApplication *)application
  openURI:(NSURI *)URI
  options:(NSDictionary<UIApplicationOpenURIOptionsKey,id> *)options
{
  return [RCTLinkingManager application:application openURI:URI options:options];
}
Please note that these steps are critical as they play a huge role in enabling your app to listen for incoming links, and if they are not set properly, your app won’t navigate to the proper screen.
You can add the code below still above @end if you want to use Universal links in your project. You can learn more about Universal links here.
// Add this above `@end`:
- (BOOL)application:(UIApplication *)application continueUserActivity:(nonnull NSUserActivity *)userActivity
  restorationHandler:(nonnull void (^)(NSArray<id<UIUserActivityRestoring>> * _Nullable))restorationHandler
{
  return [RCTLinkingManager application:application
          continueUserActivity:userActivity
          restorationHandler:restorationHandler];
}
After setting this up, you should rebuild your project in your iOS simulator. The command for that is stated above.
Open Source Session Replay
OpenReplay is an open-source, session replay suite that lets you see what users do on your web app, helping you troubleshoot issues faster. OpenReplay is self-hosted for full control over your data.

Start enjoying your debugging experience — start using OpenReplay for free.
Linking React Native Project
React Navigation seamlessly integrates with Linking, which React Native provides to handle deep links, and this is how the linking will be made possible.
First, in the App.js folder, I will declare a constant called linking, and inside it, I will input the prefixes and the config. As I said earlier, the prefixes must be the same as you stated in your URI scheme. At the same time, the config will contain a map of your screens in your project.
const linking = {
prefixes: [ 'demoapp://'],
config: {
  screens: {
      HomeScreen: 'homescreen',
      FavouriteScreen: 'favscreen',
      ProfileScreen: 'profilescreen',
      SettingsScreen: 'settingsscreen',
    },
  },
};
After this, you should attach the prefixes and config to the NavigationContainer.
const App = () => (
  <NavigationContainer linking={linking}>
  ....
  <NavigationContainer>
  );
Once this is set, you should test your application, and to do that, from your project’s root folder, run the commands below in your terminal. You can attach a screen path using the config’s stated paths.
//For Android
adb shell am start -W -a android.intent.action.VIEW -d "demoapp://profilescreen/" com.rndeeplinkingproj

//For iOS
xcrun simctl openurl booted "demoapp://profilescreen"
You can edit the profilescreen to other screen paths stated in the config, like favscreen, settingsscreen, and homescreen.
You should close your app and try running the command. You will have your app launching from background mode and navigating to the stated screen.
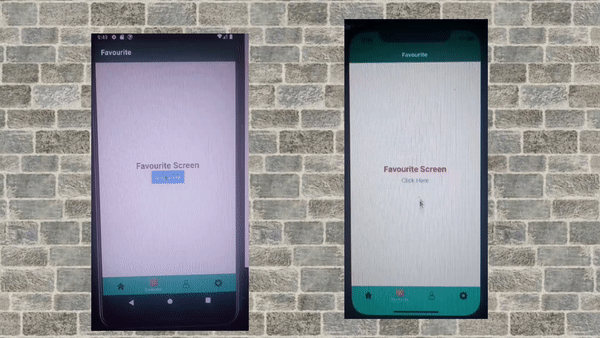
In-app Deep Linking
Now, I will demonstrate how you can set up deep linking to navigate within the application. Here, by the click on the button in the Favourite Screen, the app will navigate to the Settings Screen.
To have this show up, go to screens/FavScreen.js. I will import Linking from React Native. The code is below:
//Add at the top of the file
import {View, Text, Button, StyleSheet, Linking} from 'react-native'
Next, I will declare the deep link to the settings screen. I will update the onPress prop to use Linking from React Native and the openURL method to open the deep link. The code is:
const FavScreen = () => {
  const url_settings = 'demoapp://settingsscreen';
  return(
    <View style={styles.container}>
      <Text style={styles.title}>Favourite Screen</Text>
      <Button
      title="Click Here"
      onPress={() => Linking.openURL(url_settings)}
      />
    </View>
  );
};
Now, clicking this button will navigate you to the settings screen.

Passing Params
It will interest you to know that you can pass some parameters to the screen you are linking to therefore updating the screen when you navigate there. React Navigation provides a method for attaching a parameter to the screen path. Adding a semicolon after the forward slash adds a parameter to the path. You can learn more about how this works here.
To show an example of how this works, I will update the profile screen path with a username so that upon navigation to the profile screen, it will get the username parameter and update the screen.
config: {
    screens: {
        HomeScreen: 'homescreen',
        FavouriteScreen: 'favscreen',
        ProfileScreen: 'profilescreen/:username',
        SettingsScreen: 'settingsscreen',
      },
    },
I am working with a Nested Screen. I mean that to style the bottom tabs I am using for this tutorial, I styled a stack navigation screen and passed it into the bottom tabs component. Therefore, the target screen is inside another navigator.
To pass the parameter to the nested screen, I will do a little more modification to the ProfileScreen because the path has to be properly linked; else, the parameter will return undefined.
The main screen component is the ProfileScreen and the target screen component is Profile which is hidden in the stack navigator screen. The method below is adopted only when you have the target screen nested in another navigator. You can learn more about this here.
...
config: {
    screens: {
        HomeScreen: 'homescreen',
        FavouriteScreen: 'favscreen',
        ProfileScreen: {
        screens: {
          Profile: {
            path: 'profilescreen/:username/',
        },
        },
      },
        SettingsScreen: 'settingsscreen',
  },
  ...
After updating your config with the code above, you should set the ProfileScreen to receive and display the parameter.
Update the ProfileScreen.js thus:
const ProfileScreen = ({route}) => {
  const {username} = route.params;

  return(
    <View style={styles.container}>
    <Text style={styles.title}>
    My name is {username}
    </Text>
    </View>
  );
};
From the update, the ProfileScreen receives the parameter passed from the route and shows up as the username.
Finally, to test this, I will update the FavScreen so that on click, the app will navigate to the ProfileScreen and update it with a username.
const FavScreen = () => {

  const url_settings = 'demoapp://profilescreen/Smith';
  ...
  };
You can also use the terminal like this:
//For Android
adb shell am start -W -a android.intent.action.VIEW -d "demoapp://profilescreen/Gabriel" com.rndeeplinkingproj

//For iOS
xcrun simctl openurl booted "demoapp://profilescreen/Gabriel"
Conclusion
It is really interesting to have users navigate easily around your application and also be directed to your application by the click on a link, which is what I have demonstrated in this tutorial.
I trust this tutorial will serve all you need to set up Deep linking in your React Native project. I will be happy to help if you face any challenges while taking this tutorial.
Source: Medium


