 Blogs
Blogs
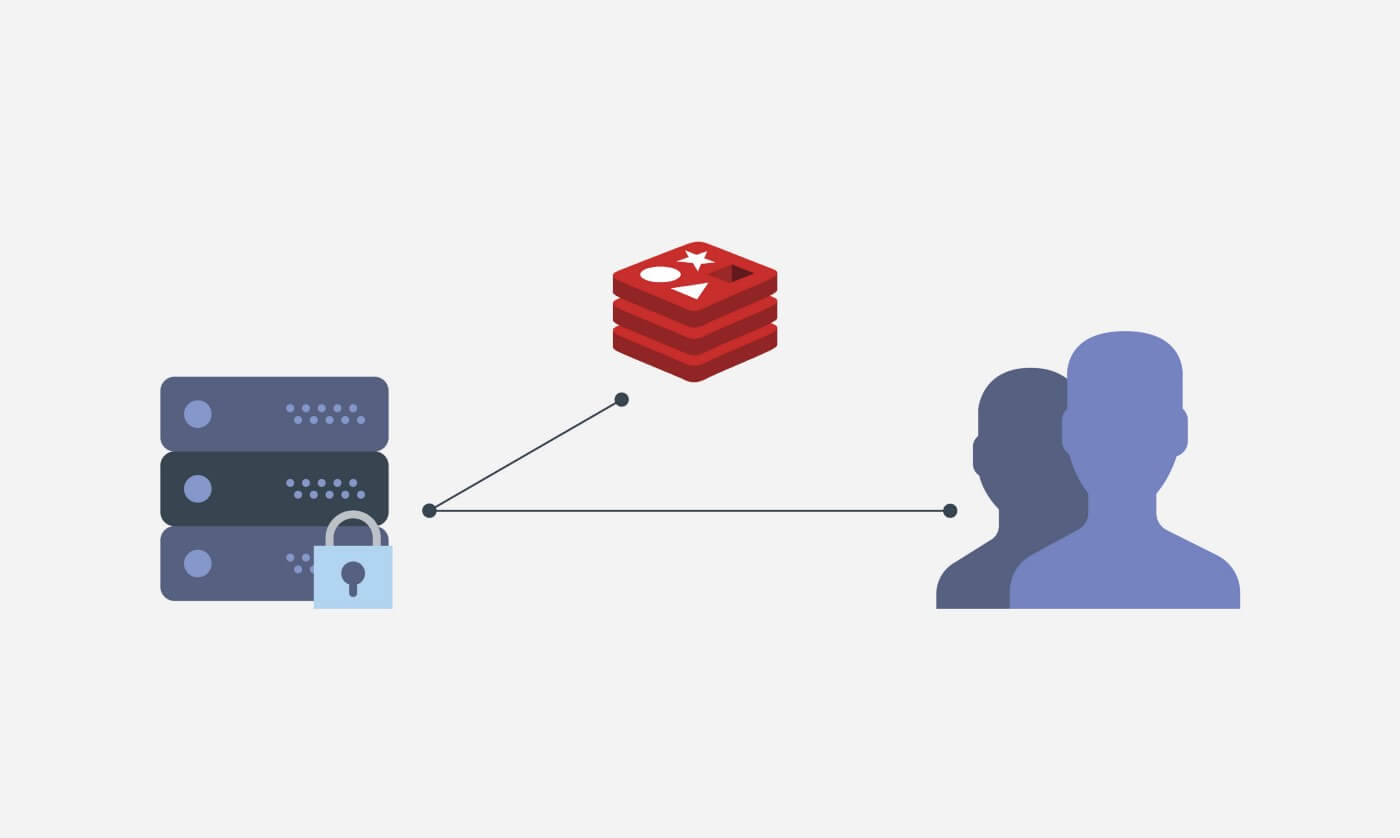
How Redis Can Make Authentication 10x Easier For Your Users
You are a developer and have probably built some applications for some users. Your users are required to sign up before they can access some resources on your application. To complete the signup, they must also verify their email. While some users are entirely ok with that extra step, most don’t find it pleasant even though they know that they have to do it. Why? It is too manual.
What if there was a better way of verifying the user’s email without making it too explicit? Well, let me introduce you to the Magic Link authentication model. You may have heard of it already or even used it somewhere before. When signing up, this is how it works from users’ perspective:
- They enter their email address
- A link is sent to that email address
- They go to their inbox and open the link (This is where the verification is applied subtly)
- They are redirected to a signup page where they will enter the rest of their details like name, password, phone, etc.
- They sign up and are immediately signed in too
Easy-peasy! No one has to know that they have to verify their email — they simply do that without noticing it. This is why the magic-link model has been intuitively embraced in modern authentication systems. But there’s a lot going on behind the scenes during this process. That is where this tutorial is focused on.
There are some ways to implement this concept on the backend and the choice is yours. But you don’t have to choose less efficient ones. Think about it. If you wanted to implement this with Express, how would you do it? Maybe you would create an endpoint (endpoint 1) that implements the following algorithm:
- Collect the email from the request body
- Generate a token using the Node.js built-in crypto package
- Store the email and token along with an expiration time in a separate (from your User) table in a database
- Inject the token into a URL (that matches a page on the frontend) and send it to the given email address
Then, another endpoint (endpoint 2, usually the signup route) that does the following:
- Check if a token is provided in the request object
- Collect the user’s details including and especially the email address
- Try to pull the record with the given token from the database from the “special” table
- If the record does not exist, return a forbidden error
- If the record exists but the expiration time has expired, return a bad request error
- If the record exists and the expiration time is still valid, create a new user with the given details
Let’s think about this approach for a moment. Do you think it’s effective? Well, everything looks ideal except for step 3 of endpoint 1. Here’s why I think so:
- Storing the token in a database is meaningless because it is just preliminary data that will become useless afterward.
- Your database will be bloated with junkie data. And you may argue that you can apply the 7th step in endpoint 2 to delete the record afterward but still, using the database for this is less efficient and not ideal for production in my opinion. I am sure you can think of other downsides to this approach.
A better approach would be to use JWT. Using JWT will handle steps 2 and 3 of endpoint 1. Then, step 3 of endpoint 2 would be geared towards validating the token with JWT instead of the database. Still, this is not the best solution. The reason is that using JWT is overkill for this simple problem.
A much better solution would be using RedisJSON.
RedisJSON is a high-performance NoSQL document store that provides native APIs to ingest, index, query, and run full-text search on JSON documents both on-premises and as a managed service in the cloud. This means that you can use RedisJSON in-memory [key-value] data structure store as a database and cache. You can learn more about it here. Let me show you how Redis can eradicate the inefficiency of step 3 of endpoint 1.
The Project
For this tutorial, I created a project that we will use throughout. It is a very simple Express application that exposes three RESTful API endpoints — /users, /users/magic_link, and /users/signup. You can clone or download the source code here. It is a dockerized application.
Prerequisites
- I assume that you already know the basics of containers and you have docker installed on your machine. If you don’t have it installed, follow this guide and choose from one of the supported platforms. You don’t know the concept of containers at all? Not a problem. Just follow the tutorial step by step and ensure to install all the necessary dependencies.
- Install docker-compose here. It’s much easier to install on Linux with these two commands:
1.
sudo curl -L “https://github.com/docker/compose/releases/download/1.25.4/docker-compose-$(uname -s)-$(uname -m)” -o /usr/local/bin/docker-compose
2.
sudo chmod +x /usr/local/bin/docker-compose
- And of course, ensure Node.js and NPM are installed.
The Project Tour
Let me walk you through the project. Open the project folder on your favorite code editor. Note that the project folder contains two folders — starter and final. The starter folder contains incomplete code and files that we need to get started. The final folder contains the completed source code.

If you wish to quickly have a glimpse of what we are about to build, first ensure that docker is up and running, then open your terminal and run the following commands:
❯ cd finalfinal ❯ docker-compose up -d --build
Docker-compose will execute all the instructions in the docker-compose.yml file. Don’t worry if you don’t understand anything about docker-compose. After all, this is not a docker tutorial 😊.
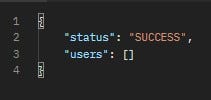
Afterward, you should visit http://localhost:4000/users. If everything is up and running, you should see a successful response like this:
To stop all the running containers execute:
final ❯ docker-compose down
Now, let’s begin!
Change the directory back and into the starter folder. In this folder, you should see the env folder with two env files — one for MongoDB and the other for the app. Another folder inside the starter folder is the utils folder containing only the mailer module for now. We will use this module for sending emails.

The rest are:
- .dockerignore file
- docker-compose.yml file containing a set of executable instructions to spin up mongodb, redis, and our magiclinkredis app images with their respective container names
- a Dockerfile with docker-recognized syntax for creating our app image
- an empty index.mjs file which will soon contain our application logic
- and the package.json file describing our application dependencies
So, let’s start all the containers. Run:
starter ❯ docker-compose up -d --build
This will look into the docker-compose file and execute the instructions line by line as described in the file. It will try to pull the image stipulated for each service and spin up their respective containers. Let’s analyze the Redis service here:
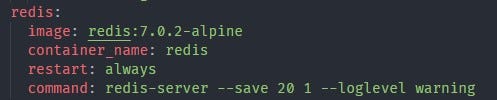
We are pulling the official Redis docker image with tag 7.0.2-alpine from the docker hub. Then, we provide the name “redis” for the container created with this image. Optionally, we can “restart” the container when something unexpected happens. Finally, we execute the command to start the Redis server. You can find this configuration and more on the official Redis docker hub page.
Because we applied a bind mount, whenever we make changes in our index.mjs file the server reloads and the changes are reflected immediately, This is useful in development.
We can follow the logs of our application by running this command:
starter ❯ docker logs magic-link-redis -f
Inside the index.mjs file, let’s import the express, mongoose, morgan, and dotenv modules. Then initialize our express server and connect it to the MongoDB database:
 import express from "express" import mongoose from "mongoose"; import morgan from "morgan"; import { config } from "dotenv";
 config({ path: "./env/.env" }); const app = express(); app.use(morgan("combined")); app.use(express.json()); app.use((req, res, next) => {  res.setHeader("Access-Control-Allow-Origin", "*");  res.setHeader("Access-Control-Allow-Methods", "GET, POST, DELETE,  OPTIONS");  res.setHeader("Access-Control-Allow-Headers", "Content-Type");  next(); }); mongoose.connect( `mongodb://${process.env.MONGODB_USERNAME}:${process.env.MONGODB_PASSWORD}@mongodb:27017/migic-link-redis?authSource=admin`,  {    useNewUrlParser: true,    useUnifiedTopology: true,  },  (err) => {    if (err) {      console.error("FAILED TO CONNECT TO MONGODB");      console.error(err);    } else {      console.log("CONNECTED TO MONGODB!!");      app.listen(4000, () =>        console.log(          `App listening on port 4000 in ${process.env.NODE_ENV} mode.`        )      );    }  });
;
You should see a message like this on your logs:
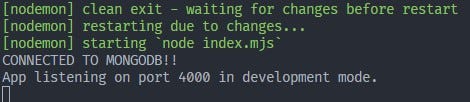
That’s a good sign 😉. Take a deep breath…you’ve done well.
Let’s create the User schema. From the root folder relative to the “starter” folder, create a new folder and name it “models”. Inside this new folder, create a “user.mjs” file.

Inside the user.mjs file put the following code:
import mongoose from "mongoose"; import bcrypt from "bcryptjs"; import validator from "validator";
  const Schema = mongoose.Schema;
  const userSchema = new Schema(  {    name: {      type: String,      trim: true,    },    email: {      type: String,      required: true,      unique: true,      lowercase: true,      validate: [validator.isEmail, "Email is invalid."],    },    password: {      type: String,      required: true,      select: false,    },  },  {
    timestamps: true,
  } );

 userSchema.pre("save", async function (next) {  if (!this.isModified("password")) return next();  // Hash password with a cost of 12  this.password = await bcrypt.hash(this.password, 12);  next(); }); const UserModel = mongoose.model("User", userSchema); export default UserModel;
Import the user schema module into the index.mjs file:
import User from "./models/user.mjs";
Let’s now create a GET /users endpoint to fetch all user documents.
app.get("/users", async (req, res) => { try { const users = await User.find(); res.status(200).json({ status: "SUCCESS", users, }); } catch (err) { console.error(err.message); res.status(500).json({ status: "FAIL", message: "Failed to fetch users." }); } });
Open your Postman (maybe) and try to call the endpoint at GET http://localhost:4000/users. You should get the following response (otherwise, duet me 😜):
On to the fun part
This is where it gets more interesting. We are going to create another endpoint that handles the magic link logic. This endpoint will do the logic of “endpoint 1” as mentioned at the onset. This time around, we will be leveraging the feature of RedisJSON.
Before creating this endpoint, we need to first create two modules: tokenGenerator.mjs and cacheHandler.mjs. Thus, inside the utils folder, create the aforementioned files and put the following code inside the tokenGenerator.mjs file:
import crypto from "crypto";export default () => crypto.randomBytes(32).toString("hex");
This module will be used to generate a random hash value converted into a string and used for the signup token.
Now, more importantly, the cache handler. This file is where we implement and connect Redis to our application. It handles three functions: getCache for querying the RedisJSON API to fetch data by a given key, setCache for storing a new cache with a given key, data, and an expiration time (in seconds), and deleteCache for removing a cache from the memory. If you want to learn more about this concept, see my previous post about how to create active user metrics using Redis here.
The code for this module is as follows:
import { createClient } from "redis"; let client; if (process.env.NODE_ENV === "production") {  client = createClient({    url: `redis://${process.env.REDIS_USER}:${process.env.REDIS_PASSWORD}@${process.env.REDIS_HOSTNAME}:${process.env.REDIS_PORT}`,  }); } else {  client = createClient({    url: "redis://redis:6379",  }); }  client.on("error", (err) => console.log("Redis Client Error", err));  async function connectRedis() {  await client.connect(); }  connectRedis();  const defaultExpirationTime = 60 * 10; // 60 seconds times 10 -> 10 minutes  const handleCache = (cb) => cb();  export const getCache = (key) =>   new Promise((resolve, reject) => {    try {      handleCache(async () => {        const data = await client.get(key);        if (data) {          console.log("DATA FOUND! 🥳");        }        resolve(JSON.parse(data));      });    } catch (error) {      reject(error);    }  });  export const setCache = (key, data, expTime) => {  if (typeof expTime === "undefined") {    expTime = defaultExpirationTime;  }  return new Promise((resolve, reject) => {    try {      handleCache(async () => {        const isOk = await client.set(key, JSON.stringify(data), {          EX: expTime,        });        if (isOk) {
          console.log("CACHED! ✅");
        }        resolve();      });    } catch (error) {      reject(error);    }  }); }; export const deleteCache = (key) =>  new Promise((resolve, reject) => {    try {      handleCache(async () => {        const response = await client.del(key);        if (response === 1) {          console.log("CACHE DELETED!");        }        resolve(JSON.parse(response));      });    } catch (error) {      reject(error);    }  });
Note that the implementation to initialize the Redis client is subject to two conditions: Connect to the local Redis service (running on the docker container on port 6379) if the application is running on the development environment. Otherwise, connect to the redis cloud service using “your” credentials. This is crucial because you should be using the cloud service in production. If you want to learn more about Redis Cloud, visit the official page. Great thing is that you can start with a free plan.
Okay! Now, let’s import our modules into the index.mjs file:
import tokenGenerator from "./utils/tokenGenerator.mjs"; import { setCache, getCache, deleteCache } from "./utils/cacheHandler.mjs"; import { sendMagicLink } from "./utils/mailer.mjs";
Note that we also imported the mailer module.
So, let’s create the magic link endpoint (endpoint 1):
app.post("/users/magic_link", async (req, res) => {
 const {
email
}
= req.body;
if (!email)
return res.status(400).json({ status: "FAIL", message: "Email required." });
try {
  // 1) check if user exists already
   const userExists = await User.findOne({ email });
   if (userExists)
return res
    .status(400)
 .json({ status: "FAIL", message: "Email already in use." });    // 2)) generate token
const token = tokenGenerator();
  // 3) store email and token in redisJSON for 24 hours    const hours24 = 60 * 60 * 24;
 await setCache(token, { email, token }, hours24);
 // 4) send token to user's email address
  sendMagicLink(email, token);
   res.status(200).json({
   status: "SUCCESS",
  message: "Link sent to your email!",    });
  } catch (err)
{
    console.error(err.message);
   res      .status(500)
 .json({
status: "FAIL", message: "Something went terribly wrong."       });  } });
Here, we are implementing the logic in endpoint 1 as mentioned at the onset but with an extra validation step that checks if an account already exists with the given email address. Then, instead of storing the temporal document in the database, we cache it with RedisJSON and set the expiration time to 24 hours. Simple 👌🏾.
I can sense your urge to test this endpoint but not so fast 😜. Note that the mailer module implements the nodemailer transporter which requires some Zoho mail credentials. This means that you should create a Zoho account here. Then, replace the value of ZOHO_USER and ZOHO_PASSWORD in the .env file with your Zoho email and password respectively. Now we are good to go.
Make a POST request to http://localhost:4000/users/magic_link with the following payload:
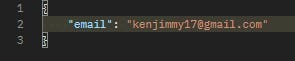
The email above should be your email of course else I’ll eat your emails 😁.
If everything is ok, you should see a message like this on your application logs:
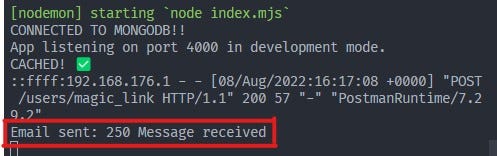
That means the email has been sent to your email address.
Finally, let’s create the signup endpoint (endpoint 2):
app.post("/users/signup", async (req, res) => { const { email, name, password } = req.body; const { token } = req.query; // 1) check if user exists already const userExists = await User.findOne({ email }); if (userExists) return res .status(400) .json({ status: "FAIL", message: "Email already in use." }); // 2) require token if (!token) return res.status(400).json({ status: "FAIL", message: "Token required." }); // 3) validate body if (!email || !name || !password) return res .status(400) .json({ status: "FAIL", message: "Invalid request." }); // 4) check if data exists on redisJSON and client email matches data email. if NOT, return "Access denied" const data = await getCache(token); if (!data || data.email !== email) return res.status(403).json({ status: "FAIL", message: "Access denied." }); // 5) if exists, create new user account let user; try { user = await User.create({ name, email, password }); await deleteCache(email); res.status(201).json({ status: "SUCCESS", message: "User saved!", user, }); } catch (err) { console.error(err.message); res.status(500).json({ status: "FAIL", message: "Failed to save user." }); }});
Here, we also make sure that we do not create an account with an already existing email address. We ensure that a token and required body details are passed to the request object. Then, we check for the existence of the token on Redis. If the token exists and the provided email matches the data email stored on Redis, we go ahead and create the user document. Thereafter we delete the cache for safety even though it will expire anyway.
How cool is that? Simple, yet efficient solution for this problem using Redis. Now, let’s test this endpoint. Go to your inbox and copy the token within the URL string. Attach the token to the request query object and send a request to http://localhost:4000/users/signup?token=YOUR_TOKEN with the following payload:
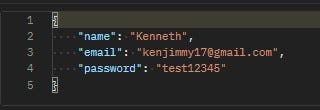
If everything is okay, you should get a successful 201 response 👍🏾.
Conclusion
Every user wants an easy life. If you want to make your app’s authentication 10 times easy for your users, leverage RedisJSON. I hope you find this tutorial helpful.
This post is in collaboration with Redis.
Source: PlainEnglish


