 Blogs
Blogs

Image Upload to Cloudinary with Node.js
Cloudinary is one of the tools/platforms that can be used to upload your images. In addition to being quick and simple to use, it also has exceptional documentation.
Obviously, in many cases, having a bucket at the cloud provider is at a better cost and perhaps more predictable. Because it is easier to deal with fixed prices or even estimates than with credits.
But sometimes we like to take advantage of free plan limits or we just don’t want to deal with infrastructure. We just want to deal with an SDK and upload the images.
It was precisely for this reason that I decided to write this article, to show that we can use the tools we use in our daily lives in a simple and effective way.
What are we going to do?
In this article I am not going to explain why we use Express together with Multer. If you need to have a small idea I recommend reading this article.
The purpose of this article is to upload an image through Express with Multer directly to Cloudinary.
As you may have already thought, and as was mentioned in the article previously referenced, the multer only works with two types of storage: DiskStorage and MemoryStorage.
So as we want to upload the image to Cloudinary, we will use a multer storage engine for Cloudinary. And of course we will still use the Cloudinary SDK so that we can assign our credentials so that the upload can be carried out.
Let’s code
Now that we have an idea of things, let’s start programming. But first we will install the following dependencies:
npm i express multer cloudinary multer-storage-cloudinary
And as always we will create a simple application in Express:
const express = require("express");

const app = express();

app.get("/", (req, res) => {
  return res.json({ message: "Hello World 🇵🇹 🙌" });
});

const start = (port) => {
  try {
    app.listen(port, () => {
      console.log(`Api up and running at: http://localhost:${port}`);
    });
  } catch (error) {
    console.error(error);
    process.exit();
  }
};
start(3333);
But first of all, we need to create an account on Cloudinary. If you have already created it, go to the “Dashboard” tab to have access to our credentials.
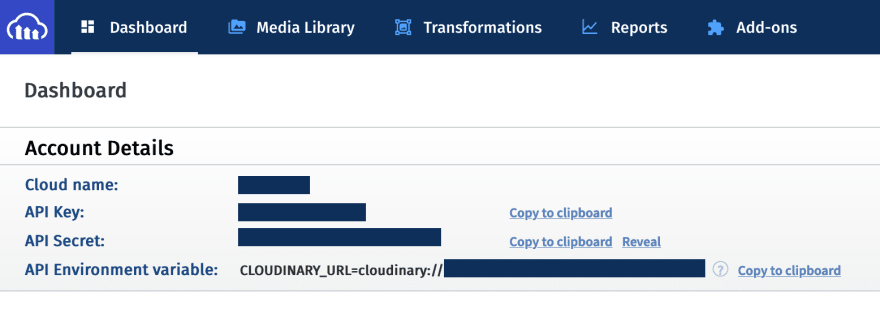
In the image above I have them hidden for security reasons. However you will see yours on this same page.
After that we can import the Cloudinary SDK and we can configure it. Just copy our credentials from the Cloudinary platform and put them in our application.
const express = require("express");
const cloudinary = require("cloudinary").v2;

const app = express();

cloudinary.config({
  cloud_name: "YOUR_CLOUD_NAME",
  api_key: "YOUR_API_KEY",
  api_secret: "YOUR_API_SECRET",
});
Now that we have the Cloudinary configuration done, we now have to configure our multer engine. For this we will import CloudinaryStorage from the multer-storage-cloudinary dependency.
After that we will pass our Cloudinary configuration and we will also pass a parameter to place our images in a folder called “DEV” (if the folder does not exist, it will be created automatically).
const express = require("express");
const cloudinary = require("cloudinary").v2;
const { CloudinaryStorage } = require("multer-storage-cloudinary");

const app = express();

cloudinary.config({
  cloud_name: "YOUR_CLOUD_NAME",
  api_key: "YOUR_API_KEY",
  api_secret: "YOUR_API_SECRET",
});

const storage = new CloudinaryStorage({
  cloudinary: cloudinary,
  params: {
    folder: "DEV",
  },
});
Now we need to import the multer and tell it where our images should be kept. As you may already calculate, we will pass on the configuration of our Cloudinary Storage. We named it storage.
const express = require("express");
const cloudinary = require("cloudinary").v2;
const { CloudinaryStorage } = require("multer-storage-cloudinary");
const multer = require("multer");

const app = express();

cloudinary.config({
  cloud_name: "YOUR_CLOUD_NAME",
  api_key: "YOUR_API_KEY",
  api_secret: "YOUR_API_SECRET",
});

const storage = new CloudinaryStorage({
  cloudinary: cloudinary,
  params: {
    folder: "DEV",
  },
});

const upload = multer({ storage: storage });
Now just create our POST verb type endpoint so that we can upload our images. But first we need to pass our upload as middleware and we still have to indicate that we are going to upload only one image at a time. I also mention that I named the image field “picture”.
Last but not least, as soon as we upload the image, the link will be returned to us so we can see it in the browser. But the same applies if you want to save the link in a database, just use req.file.path.
app.post("/", upload.single("picture"), async (req, res) => {
  return res.json({ picture: req.file.path });
});
The final code should be as follows:
const express = require("express");
const cloudinary = require("cloudinary").v2;
const { CloudinaryStorage } = require("multer-storage-cloudinary");
const multer = require("multer");

const app = express();

cloudinary.config({
  cloud_name: "YOUR_CLOUD_NAME",
  api_key: "YOUR_API_KEY",
  api_secret: "YOUR_API_SECRET",
});

const storage = new CloudinaryStorage({
  cloudinary: cloudinary,
  params: {
    folder: "DEV",
  },
});

const upload = multer({ storage: storage });

app.get("/", (req, res) => {
  return res.json({ message: "Hello World 🇵🇹 🙌" });
});

app.post("/", upload.single("picture"), async (req, res) => {
  return res.json({ picture: req.file.path });
});

const start = (port) => {
  try {
    app.listen(port, () => {
      console.log(`Api up and running at: http://localhost:${port}`);
    });
  } catch (error) {
    console.error(error);
    process.exit();
  }
};
start(3333);
Now that our Api is already complete, just test it using your favorite client (Postman, Insomnia, etc). As soon as you upload an image, you can go to the “Media Library” tab and see that a folder called “DEV” was created with the image you just uploaded. Similar to this:
What about you?
Have you used Cloudinary in the past or would you prefer to use buckets from cloud providers?
Source: DEV


