 Blogs
Blogs

Build a Text-to-Speech component in React
Text-to-speech feature is now available on relatively any website or blog. It’s a game changer that you can listen to the content instead of reading it. Especially effective for people with visual or cognitive impairments or on the go. I came up with the idea to implement it for my blog, so this is how I started researching this topic which ended up being a tutorial for you. So in this tutorial, we will go through the process of building a text-to-speech component in React. We will use the Web Speech API to implement the text-to-speech functionality.
What we are building
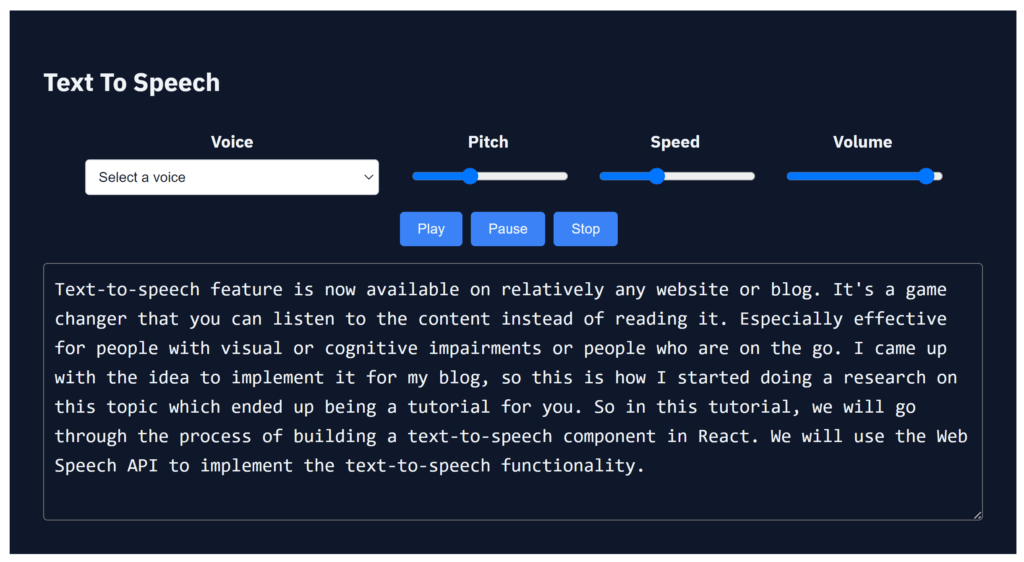
This is what the result will look like.
Can I use window.speechSynthesis?

Initial setup
You can use any React boilerplate to get started. I will be using the Create React App boilerplate to create a new React app.
You can install it using the following command:
npx create-react-app text-to-speechOnce the app is created, you can start the development server using the following command:
cd text-to-speech
yarn start
Creating the Text-to-Speech component
The first step is to create a new component called TextToSpeech that will read the content of our blog post. Let’s create a file called TextToSpeech.js.
import React, { useState, useEffect } from "react";

const TextToSpeech = ({ text }) => {
  const [isPaused, setIsPaused] = useState(false);
  const [utterance, setUtterance] = useState(null);

  useEffect(() => {
    const synth = window.speechSynthesis;
    const u = new SpeechSynthesisUtterance(text);

    setUtterance(u);

    return () => {
      synth.cancel();
    };
  }, [text]);

  const handlePlay = () => {
    const synth = window.speechSynthesis;

    if (isPaused) {
      synth.resume();
    }

    synth.speak(utterance);

    setIsPaused(false);
  };

  const handlePause = () => {
    const synth = window.speechSynthesis;

    synth.pause();

    setIsPaused(true);
  };

  const handleStop = () => {
    const synth = window.speechSynthesis;

    synth.cancel();

    setIsPaused(false);
  };

  return (
    <div>
      <button onClick={handlePlay}>{isPaused ? "Resume" : "Play"}</button>
      <button onClick={handlePause}>Pause</button>
      <button onClick={handleStop}>Stop</button>
    </div>
  );
};

export default TextToSpeech;
This code defines a new functional component called TextToSpeech. The component takes the text prop as input and creates a new SpeechSynthesisUtterance object that contains the text to be spoken. The useEffect hook is used to initialise the utterance state and cancel any ongoing speech synthesis when the component is unmounted.
The component also defines three event handlers for playing, pausing, and stopping the speech synthesis. When the Play/Resume button is clicked, the speak method of the SpeechSynthesis interface is called to start/resume the speech synthesis. Similarly, the pause and cancel methods are called when the Pause and Stop buttons are clicked, respectively.
In case you are curious what we save into utterance state, here is the output of the SpeechSynthesisUtterance object.
SpeechSynthesisUtterance
text: "Text-to-speech feature is ..."
lang: ""
voice: null
volume: 1
rate: 1
pitch: 1
onstart: null
onend: null
onerror: null
onpause: null
onresume: null
onmark: null
onboundary: null
addEventListener: ƒ addEventListener() {}
dispatchEvent: ƒ dispatchEvent() {}
removeEventListener: ƒ removeEventListener() {}
<constructor>: "SpeechSynthesisUtterance"
Usage of the Text-to-Speech component
Okay, so now when we have a basic TextToSpeech component created, we can use it in our blog post.
import TextToSpeech from './TextToSpeech';

const BlogPost = () => {
  const text =
    "Text-to-speech feature is now available on relatively any website or blog. It's a game changer that you can listen to the content instead of reading it. Especially effective for people with visual or cognitive impairments or on the go. I came up with the idea to implement it for my blog, so this is how I started researching this topic which ended up being a tutorial for you. So in this tutorial, we will go through the process of building a text-to-speech component in React. We will use the `Web Speech API` to implement the text-to-speech functionality.";

  return (
    <div>
      <h1>My Blog Post</h1>
      <TextToSpeech text={text} />
      <p>{text}</p>
    </div>
  );
};

export default BlogPost;
Testing the Text-to-Speech Component
Yay, we made it so far so let’s test how it works.

Next steps, we can add more features to it, such as changing the speech synthesis’s voice, speed, and pitch. We have a lot of options what we can do, but I we will cover the most valuable parts.
Adding voice, speed and pitch controls
To add controls for changing the voice, speed, and pitch of the speech synthesis, we can create new state variables for each of these properties in our TextToSpeech component. We can then add input elements to allow the user to adjust these properties.
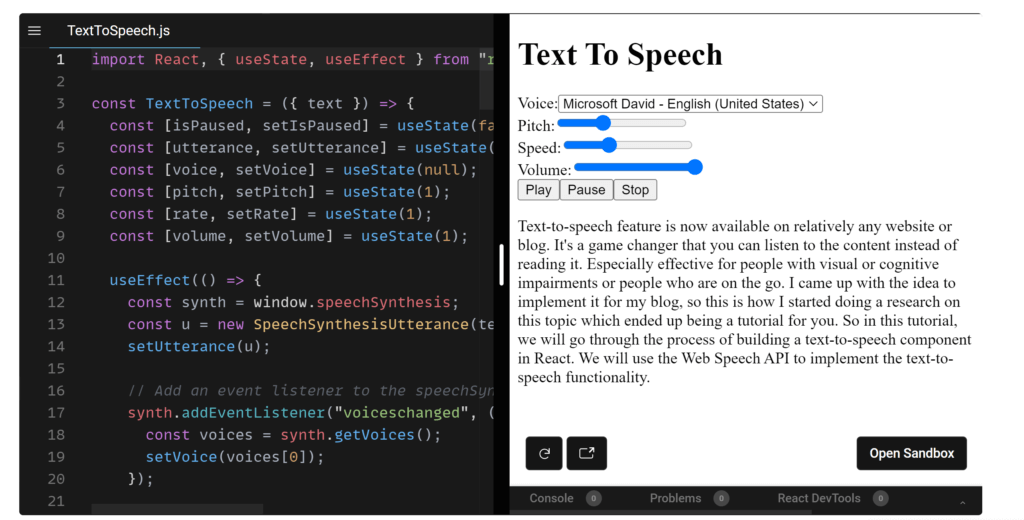
import React, { useState, useEffect } from "react";

const TextToSpeech = ({ text }) => {
  const [isPaused, setIsPaused] = useState(false);
  const [utterance, setUtterance] = useState(null);
  const [voice, setVoice] = useState(null);
  const [pitch, setPitch] = useState(1);
  const [rate, setRate] = useState(1);
  const [volume, setVolume] = useState(1);

  useEffect(() => {
    const synth = window.speechSynthesis;
    const u = new SpeechSynthesisUtterance(text);
    const voices = synth.getVoices();

    setUtterance(u);
    setVoice(voices[0]);

    return () => {
      synth.cancel();
    };
  }, [text]);

  const handlePlay = () => {
    const synth = window.speechSynthesis;

    if (isPaused) {
      synth.resume();
    } else {
      utterance.voice = voice;
      utterance.pitch = pitch;
      utterance.rate = rate;
      utterance.volume = volume;
      synth.speak(utterance);
    }

    setIsPaused(false);
  };

  const handlePause = () => {
    const synth = window.speechSynthesis;

    synth.pause();

    setIsPaused(true);
  };

  const handleStop = () => {
    const synth = window.speechSynthesis;

    synth.cancel();

    setIsPaused(false);
  };

  const handleVoiceChange = (event) => {
    const voices = window.speechSynthesis.getVoices();
    setVoice(voices.find((v) => v.name === event.target.value));
  };

  const handlePitchChange = (event) => {
    setPitch(parseFloat(event.target.value));
  };

  const handleRateChange = (event) => {
    setRate(parseFloat(event.target.value));
  };

  const handleVolumeChange = (event) => {
    setVolume(parseFloat(event.target.value));
  };

  return (
    <div>
      <label>
        Voice:
        <select value={voice?.name} onChange={handleVoiceChange}>
          {window.speechSynthesis.getVoices().map((voice) => (
            <option key={voice.name} value={voice.name}>
              {voice.name}
            </option>
          ))}
        </select>
      </label>

      <br />

      <label>
        Pitch:
        <input
          type="range"
          min="0.5"
          max="2"
          step="0.1"
          value={pitch}
          onChange={handlePitchChange}
        />
      </label>

      <br />

      <label>
        Speed:
        <input
          type="range"
          min="0.5"
          max="2"
          step="0.1"
          value={rate}
          onChange={handleRateChange}
        />
      </label>
      <br />
      <label>
        Volume:
        <input
          type="range"
          min="0"
          max="1"
          step="0.1"
          value={volume}
          onChange={handleVolumeChange}
        />
      </label>

      <br />

      <button onClick={handlePlay}>{isPaused ? "Resume" : "Play"}</button>
      <button onClick={handlePause}>Pause</button>
      <button onClick={handleStop}>Stop</button>
    </div>
  );
};

export default TextToSpeech;
Whoa, that’s a lot of changes to our initial code. So let’s discuss what happened here. We’ve added new state variables for voice, pitch, rate and volume and input elements for controls. We’ve also added a select element to allow the user to choose from the available voices.
We’ve updated the handlePlay function to set the voice, rate, and pitch properties of the SpeechSynthesisUtterance object based on the current state of our component.
Now when I learnt a lot about Web Speech API, I can’t wait to implement it in this blog. I hope you enjoyed this article and learned something new too. If you have any questions or suggestions, drop a comment below.
Source: Edvins


